The store will not work correctly in the case when cookies are disabled.
Feeder-Robot: Setting an Automatic Feeding Schedule via Control Panel
Feeding Modes
Gravity Feed Mode - An automatic feeding option that tops off the Food Bowl every 6 hours.
Snack or Manual Feed - A way to dispense a single portion, or ‘snack’, on demand and separate from programmed scheduled meals.
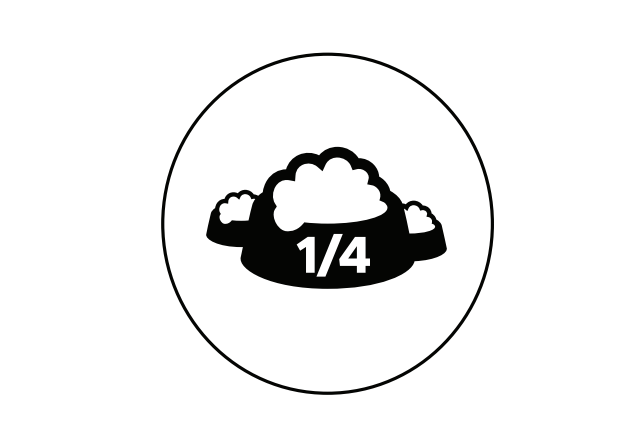
Automatic Feeding - An automatic feeding schedule can be programmed, via the Control Panel or app, to dispense food in 1/4-cup (50 g) or 1/8-cup (25 g) increments at a selected daily frequency.
Programming Options
- Programmed via Control Panel
- Maximum daily feeding available is 4 cups (800 g) per day.
- Programmed via App
- Maximum daily feeding available is 8 cups (1.6 kg) per day.
- See page 20 in your manual for instructions
Setting an Automatic Feeding Schedule via Control Panel
Power On 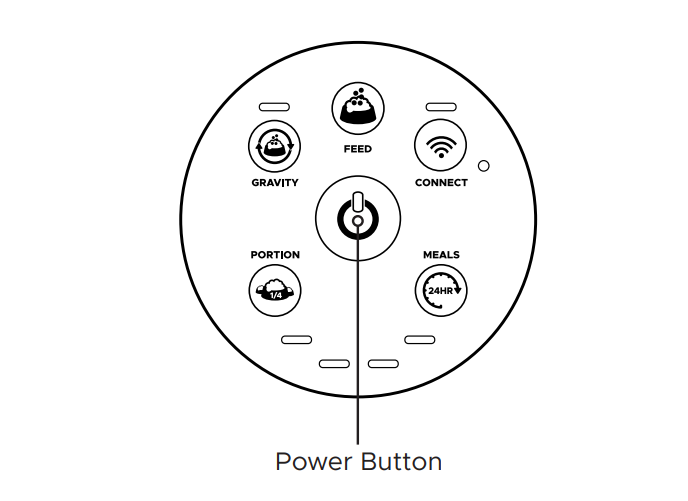
Make sure the unit is plugged into the wall. Press the Power button to turn the Feeder-Robot ON.
Determine Feeding Schedule
Before you start, make note of how many cups of food per day you want to feed your pet. For reference, standard veterinary guidelines suggest:
- Cats
- Two 1/4-cup (50 g) meals per day per cat.
- Dogs
- Two 1/2-cup (100 g) meals per day per 15-pound (6.8 kg) dog.
- Dogs that weigh 30 pounds (13.6 kg) or more may require 2-4 cups (400-800 g) of food per day
Note: Your individual pet's needs may vary from these recommendations and it is best to check with your veterinarian for required daily portions depending on food type.
Set Portion
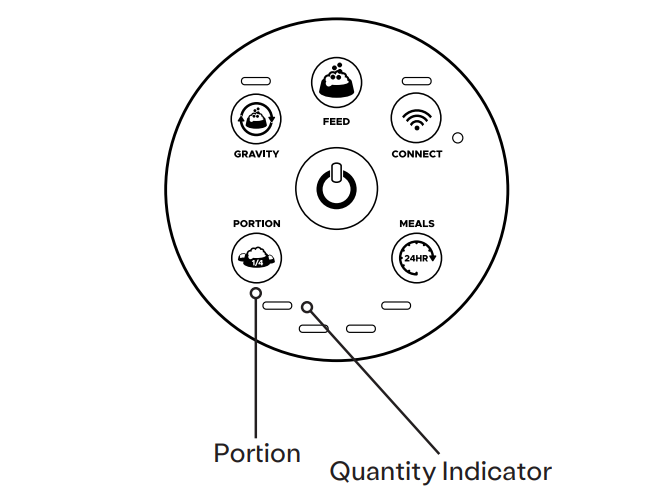
- Press the Portion button once to see the current setting - all four lights flashing indicates zero cups set.
- Press the Portion button again and then repeatedly to continue incrementing the quantity. Note that the Portion will increment from left to right. Setting will automatically save after 2 seconds of inactivity.
- The maximum dispensed per meal is 1 cup (4 x 1/4 cups) or 200 g. You will see the Quantity Indicator Lights (see image above) between the Portion and Meals buttons correspond to how many 1/4-cup (50 g) increments will be dispensed per meal.
Note: All four Quantity Indicator Lights may flash upon initial press of the Portion or Meals buttons to indicate zero Portion or Meals set.
Set Feeding Frequency

- Press the Meals button once to see the current setting - all four lights flashing indicate zero meals set.
- Press the Meals button again, and then repeatedly to continue incrementing the quantity. Note that the Meals will increment from right to left. Setting will automatically save after 2 seconds of inactivity.
- The maximum number of meals dispensed per day is 4. You will see the Quantity Indicator Lights between the Portion and Meals buttons correspond to how many meals will be dispensed per day.
Note: The unit will start the feeding schedule immediately after both portion and meals are initially entered, and the first meal will be dispensed.
Once a schedule is set from the Control Panel, you can adjust the portion without affecting the timing of the scheduled meal. If the number of meals is changed, then the scheduled timing will be restarted and the first programmed meal will be dispensed immediately. Setting either Portion or Meals back to zero (all four Quantity Indicator Lights blinking) will turn the schedule off.
Need technical support?
Troubleshooting Wizard
Our Troubleshooting Wizard will solve most issues and is the fastest way to get help.
Didn't find what you're looking for?
Live support available Mon-Fri: 9AM-9PM EST and Sat-Sun: 9AM-5PM EST, or submit a ticket anytime.