The store will not work correctly in the case when cookies are disabled.
--BI.png)
Litter-Robot 3: Motor installation guide
The replacement motor works in any Litter-Robot 3 model. The motor assembly includes a protective black motor cap (not pictured). Install the motor cap intact.
Tools Needed:
- 8-inch (20 cm) #2 Phillips screwdriver
- Needle-nose pliers
- Press the power button to turn the unit off and unplug it from the wall.
- Remove the Bonnet, Globe, and Waste Drawer.
-
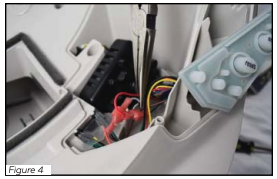
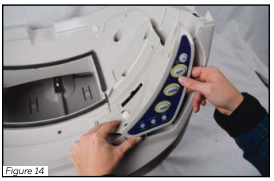
The plastic component that covers the control panel on the base is called the bezel. Unscrew the 5 screws to remove the bezel.

-
Use needle-nose pliers to lift the bezel out of place.

Note: The circuit board and keypad may be held in place by a piece of tape (assembly aid). If present, simply remove it; it is not required for reassembly.
-
Let the keypad and circuit board hang gently; you do not have to disconnect any wires from it.

-
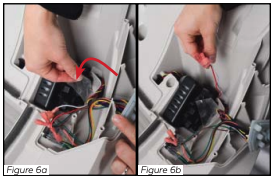
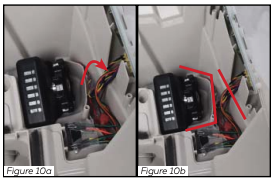
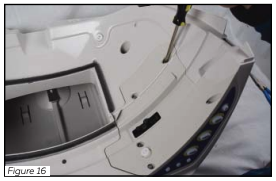
In front of the black gear, locate the red and white wires and use the needle-nose pliers to lift them out of the wire channel.
-
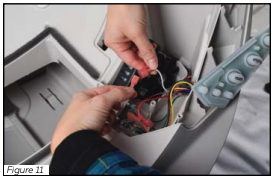
With your fingers, separate the two wire connectors: white from brown; red from green.

- Free the motor wires by peeling back the piece of tape that holds the wires in the channel and out of the way of the motor.
Note: It is best to reuse the tape. If the tape cannot be reused, replace it with a piece of stretchable tape that adheres strong to the base to ensure it will remain in place over time.
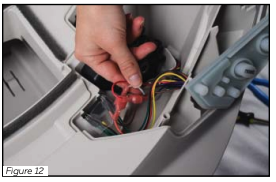
-
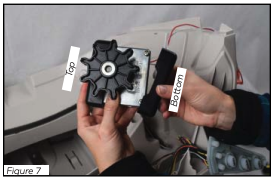
Lift the motor assembly out of the cavity and remove the two black motor gloves, noting from which sides you are removing them.
-
Fit the two motor gloves from the old motor onto the new motor. Fit them onto the top and bottom as shown in figure 8.

-
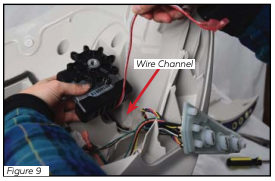
Hold the motor in your left hand and with your right, pull the red and white wires taut against the bottom of the motor. Lower the motor into the cavity, ensuring the red and white wires are positioned below it in the wire channel.
-
Check that no wires in front of the motor are in the way of the black gear. Tuck the motor wires in the wire channel that runs in front of the motor and secure them with the tape. Make sure everything lays flat in the channel.
-
Reconnect the motor wires. Connect the red wire to the green wire and the white wire to the brown wire.
-
Tuck the two wire connectors in the wire channel to the left, so they are out of the way of the motor and gear.
-
Make sure the wires attached to the circuit board are tucked behind it in the wire channel.
-
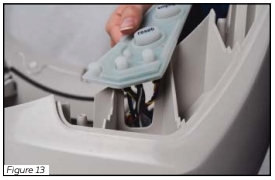
Reassemble the bezel onto the circuit board and keypad by holding the circuit board upright and fitting the bezel over it, so the buttons come through the control panel. Make sure the edges of the bezel rest flush with the base. Once in place, look through the opening where the black gear protrudes and make sure no wires are visible. If wires are visible, remove the bezel, tuck them into the wire channel, and secure them with stretchable tape.
-
Attach the bezel by tightening the 5 screws. Do not over tighten.
- Reassemble the Globe, Bonnet, and Waste Drawer. Plug the unit in, turn it on, and let the initial cycle finish. The globe should return to the home position with the blue ready light on.
If you're getting three flashing lights, it is most likely due to the position sensor being out of place. Follow the steps in our Litter-Robot 3: All three lights flashing (Globe position fault) guide to inspect the position sensor.
If your unit does not cycle or does not cycle properly, review your installation and submit a support request if you still need assistance.

Didn't find what you're looking for?
Live support available Mon-Fri: 9AM-9PM EST and Sat-Sun: 9AM-5PM EST, or submit a ticket anytime.