The store will not work correctly in the case when cookies are disabled.
Litter-Robot EVO: Overloaded globe error
If your Litter-Robot EVO displays an Overloaded Globe notification on the LCD screen, follow the steps below to identify and correct the issue.
Quick links
Preparation
If Litter-Robot EVO becomes jammed or overloaded during rotation, the motor will stop and retract briefly, causing Litter-Robot EVO to stop cycling. After a short pause, the unit will attempt to continue the cycle.
If unit is unable to cycle, the globe will stop and the LCD screen will display an Overloaded Globe notification.
If your unit has an Overloaded Globe notification this indicates that the globe is most likely jammed or excess weight has been detected.
You will also receive a notification on your phone if you use the Whisker app.
If the Litter-Robot EVO globe is stuck mid-cycle, open the bonnet and pick up the globe by the rib at the top of the globe entrance to manually rotate it back to the Home position before proceeding with next steps.
Before you begin
Make sure your unit is plugged in.
Make sure your unit is connected and online.
Make sure your firmware is up-to-date. If the app does not give you the option to update, you have the latest version.
Remove excess weight
Check that your unit is not overfilled with litter. If the litter is filled above the line, remove some litter until it is up to the raised MAX fill line.
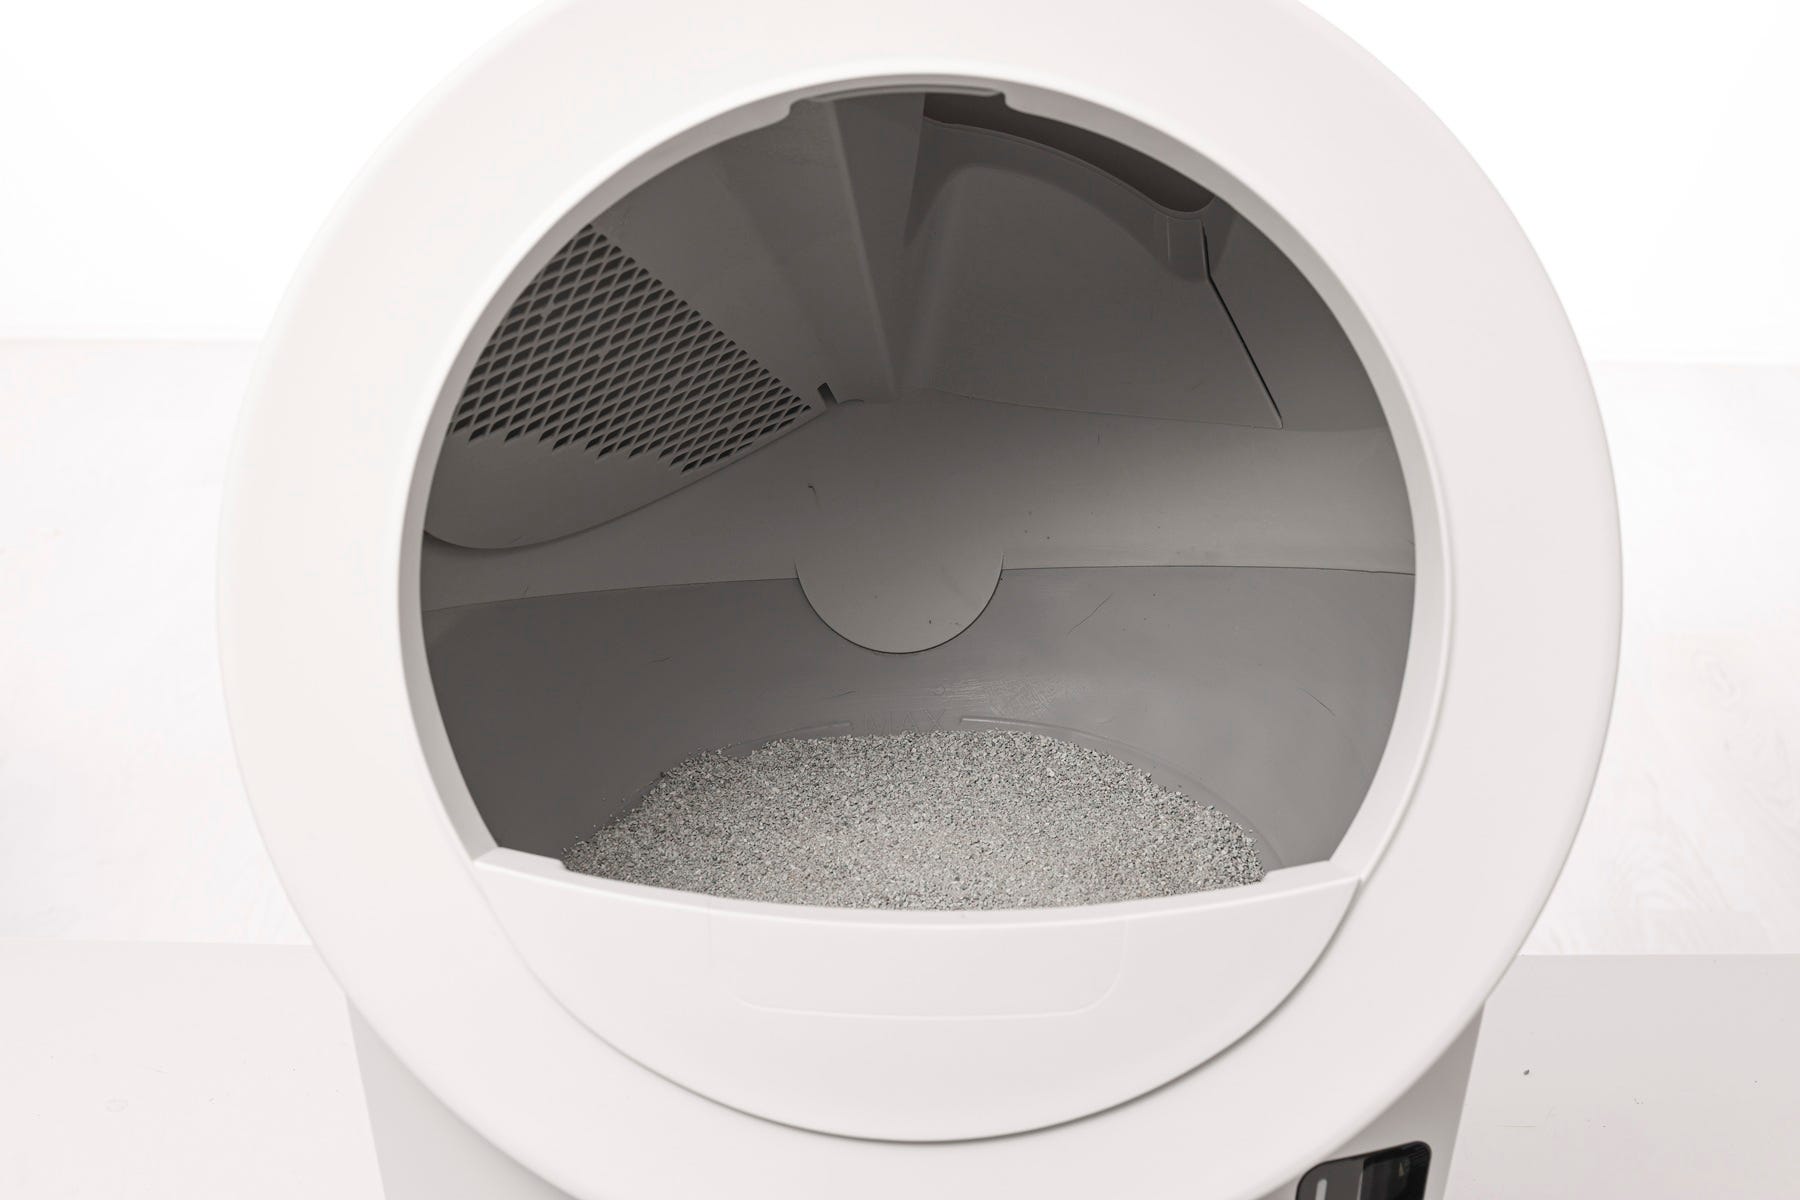
- If you recently added litter, the globe could have slowed down enough to trigger this fault. If the issue has cleared after an additional cycle, there should be no issue with your unit.
- Now, let's run a test cycle:
- Short press the Cancel button.
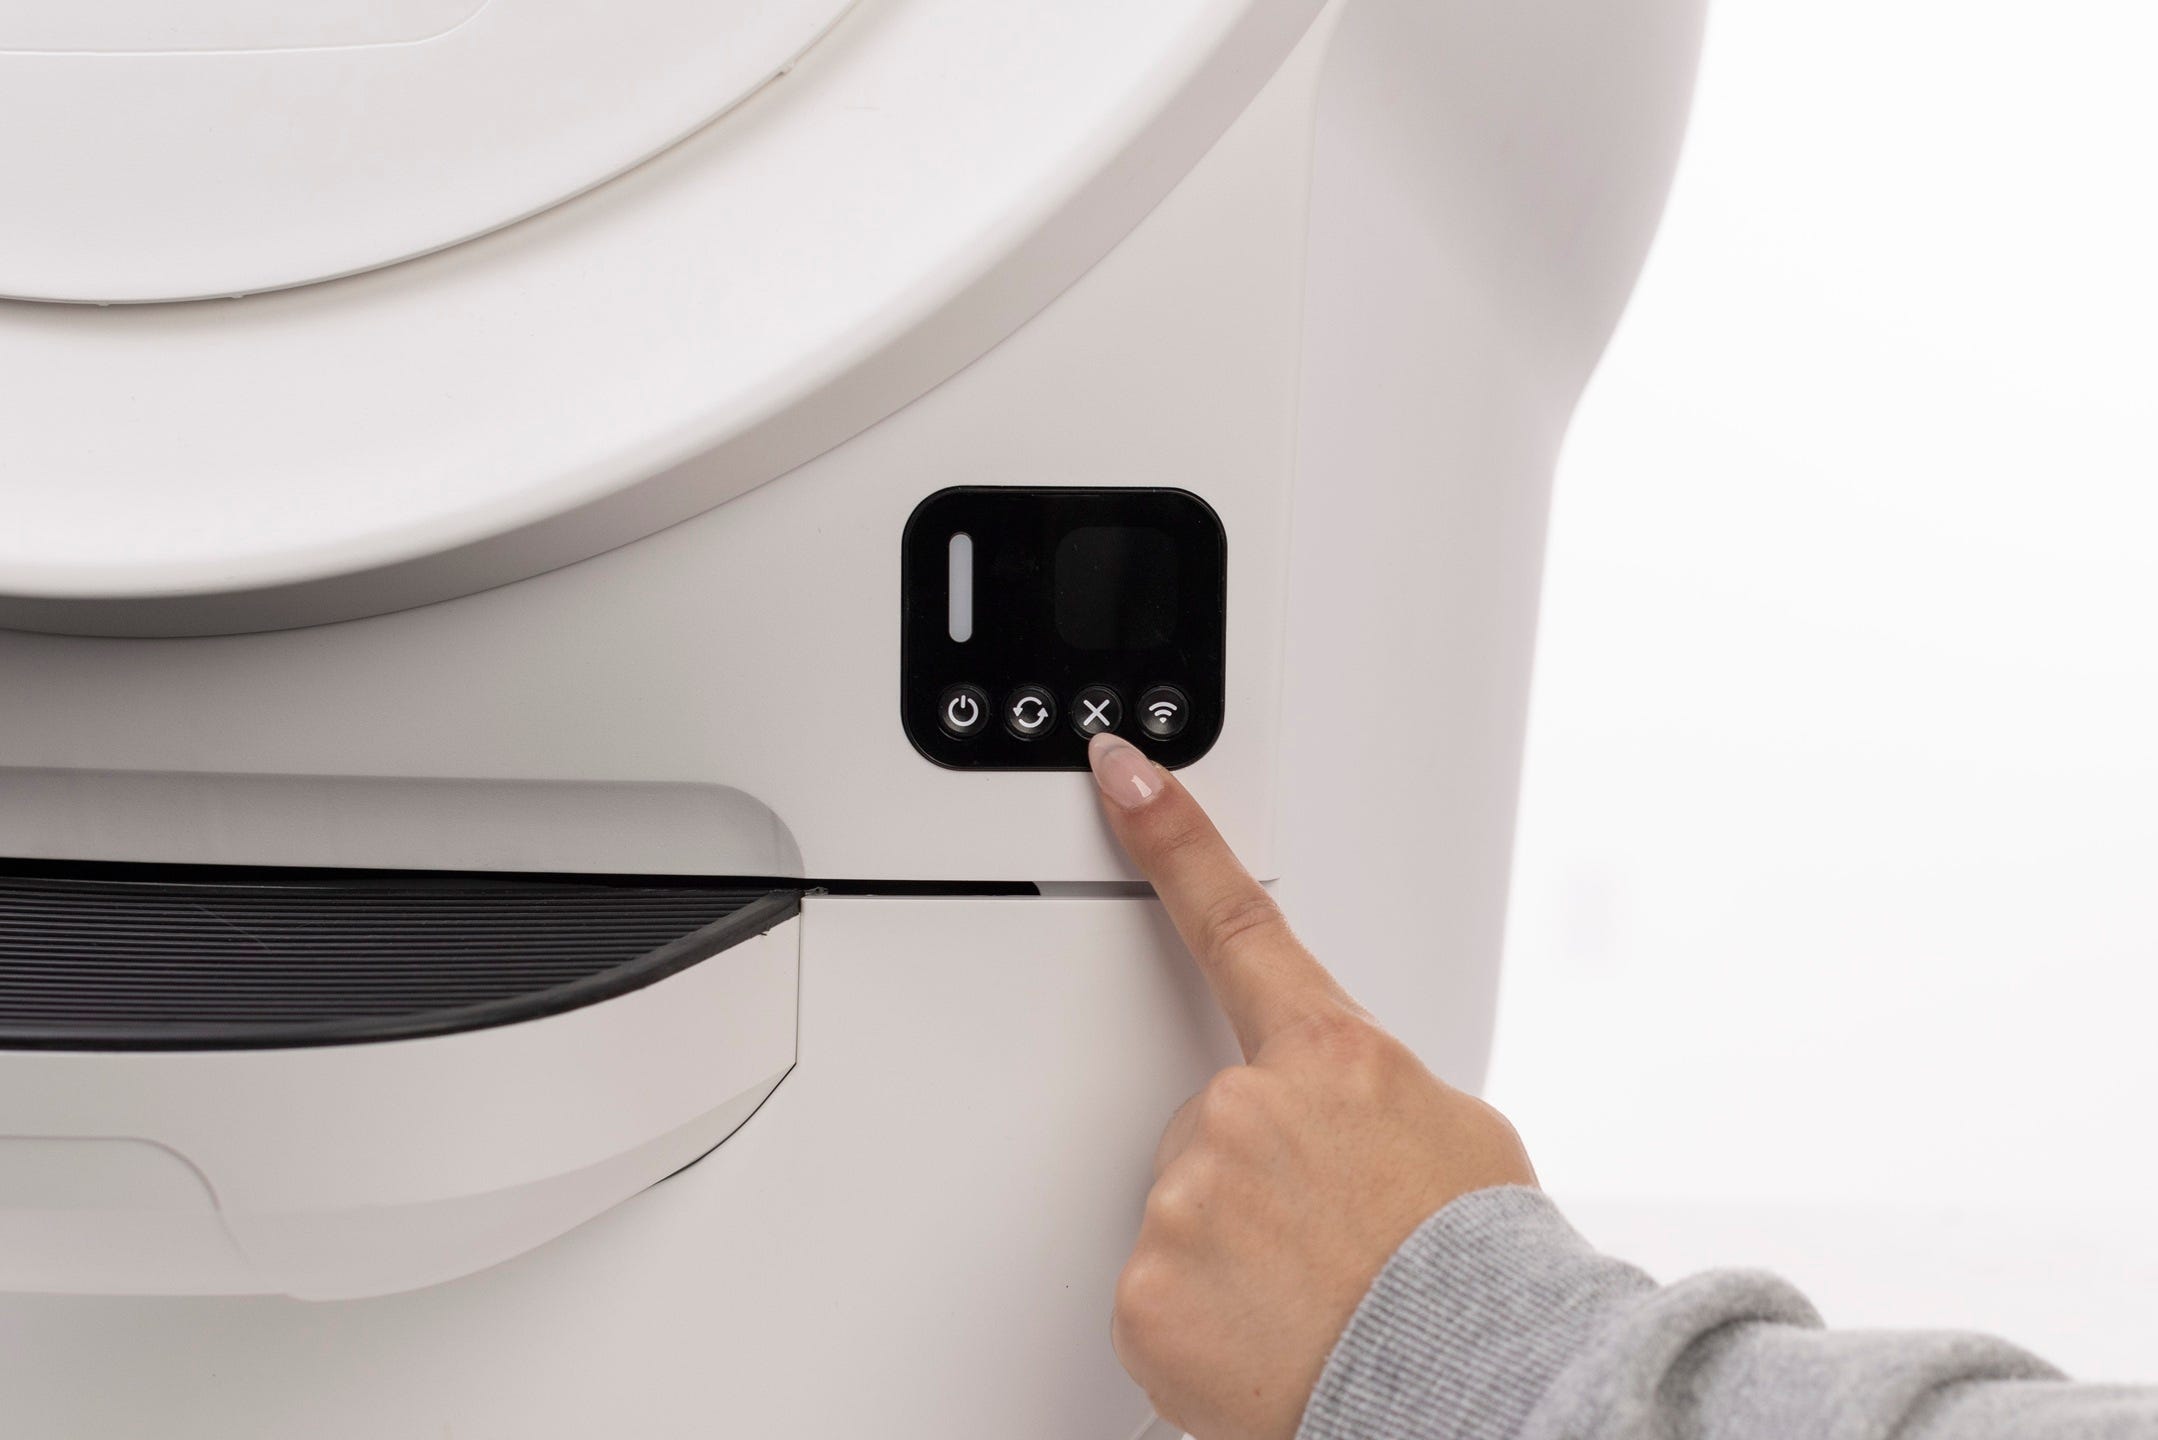
- Then short press the Cycle button to run a Clean cycle.
- After your Litter-Robot cycles, it should return to the Home position, displaying a solid white LED Indicator Light.
Successful: If your unit displays a solid white LED Indicator Light, you've been successful.
Unsuccessful: If you are still seeing an Overloaded Globe notification, please continue.
Check for obstructions
We will be looking for any obstructions that may be overloading or jamming the globe during the cycle, which could have caused the fault you are experiencing.
First, we will inspect the bonnet and globe to look for any issues.
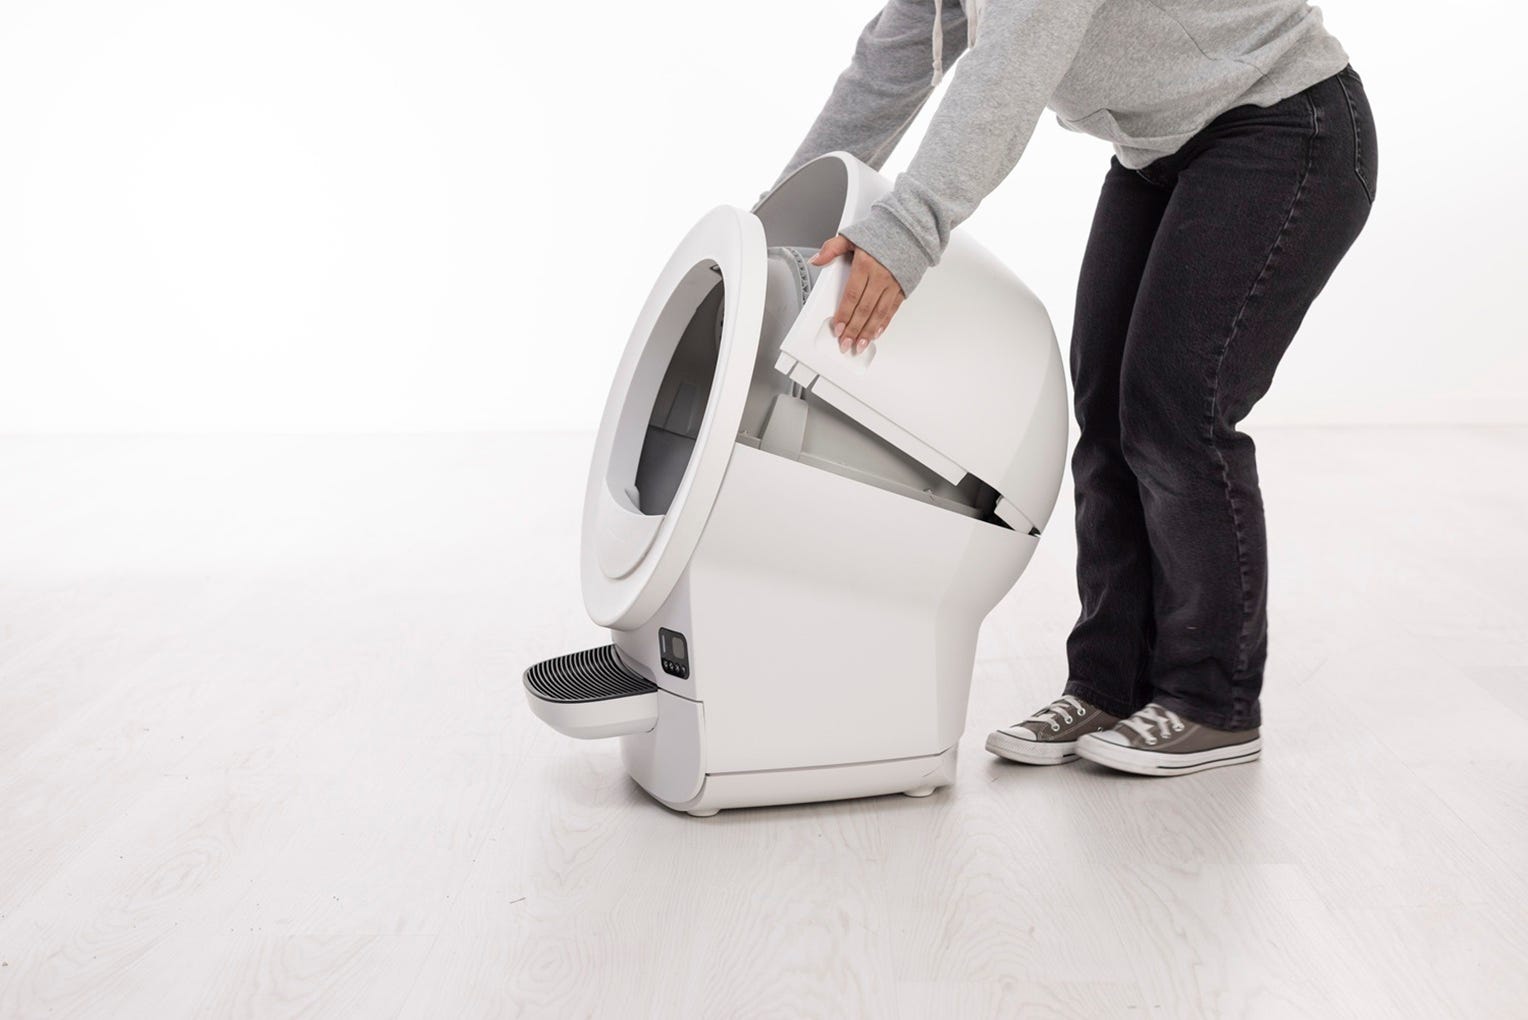
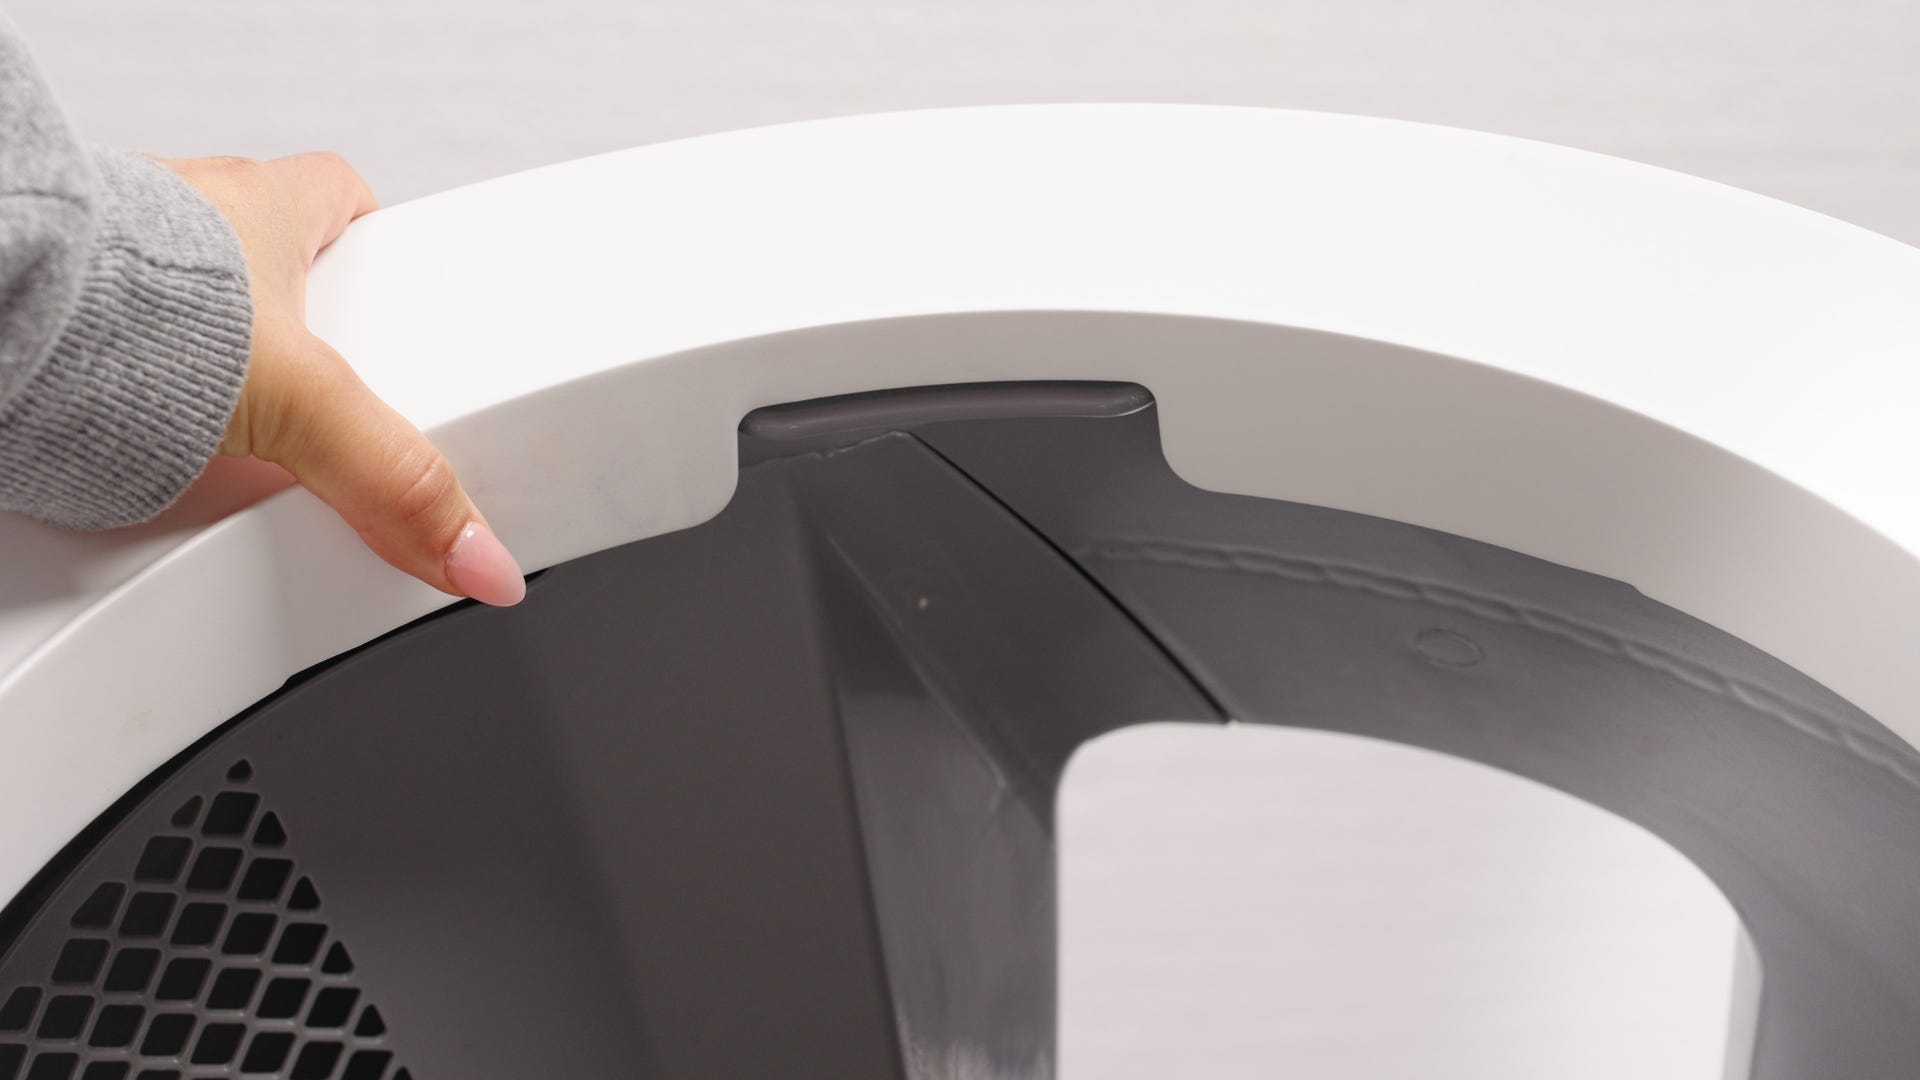
Removing the bonnet
- To open the bonnet, use the handles on both sides to rotate the bonnet to the open position. Remove the bonnet and set aside.
- The LCD screen will display a Bonnet Removed message.
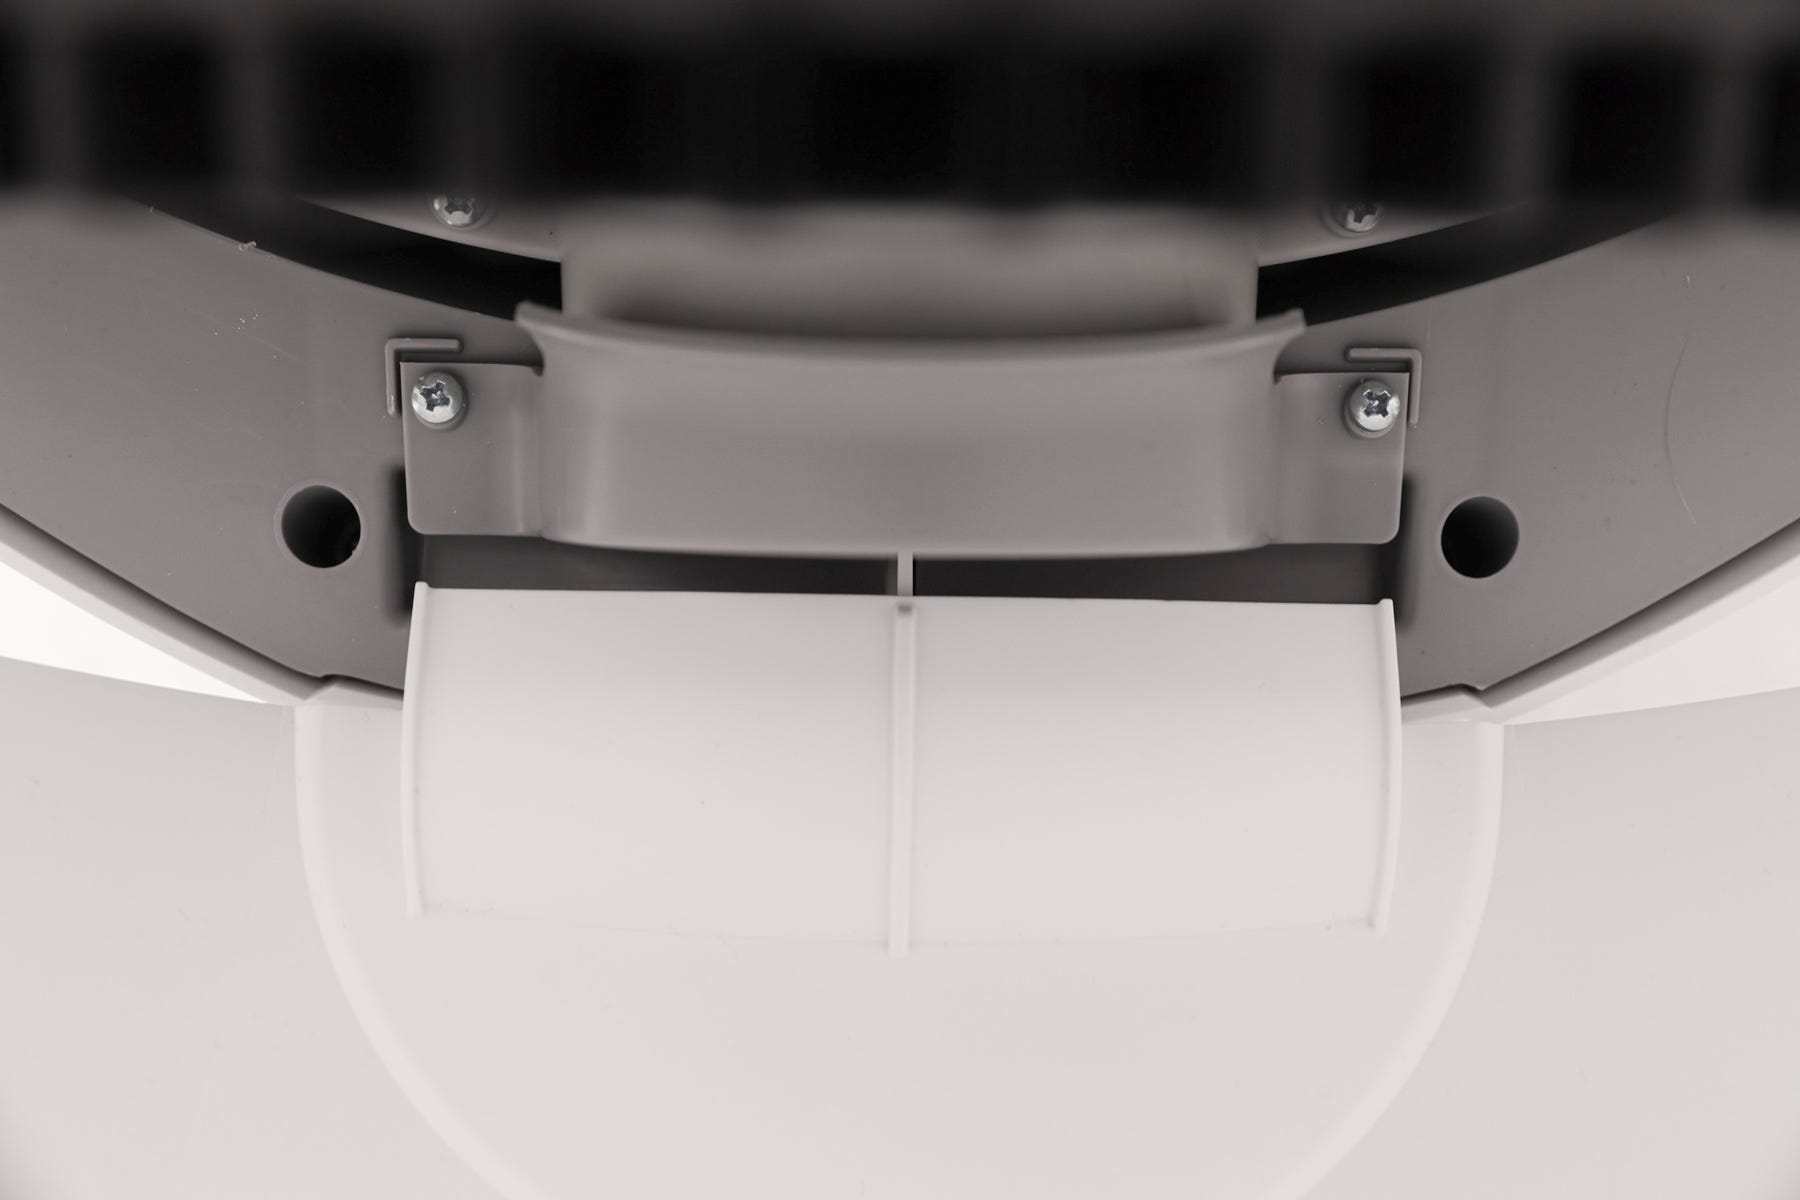
Removing the globe
- Lift the globe by the rib at the top of the globe entrance and set it aside.
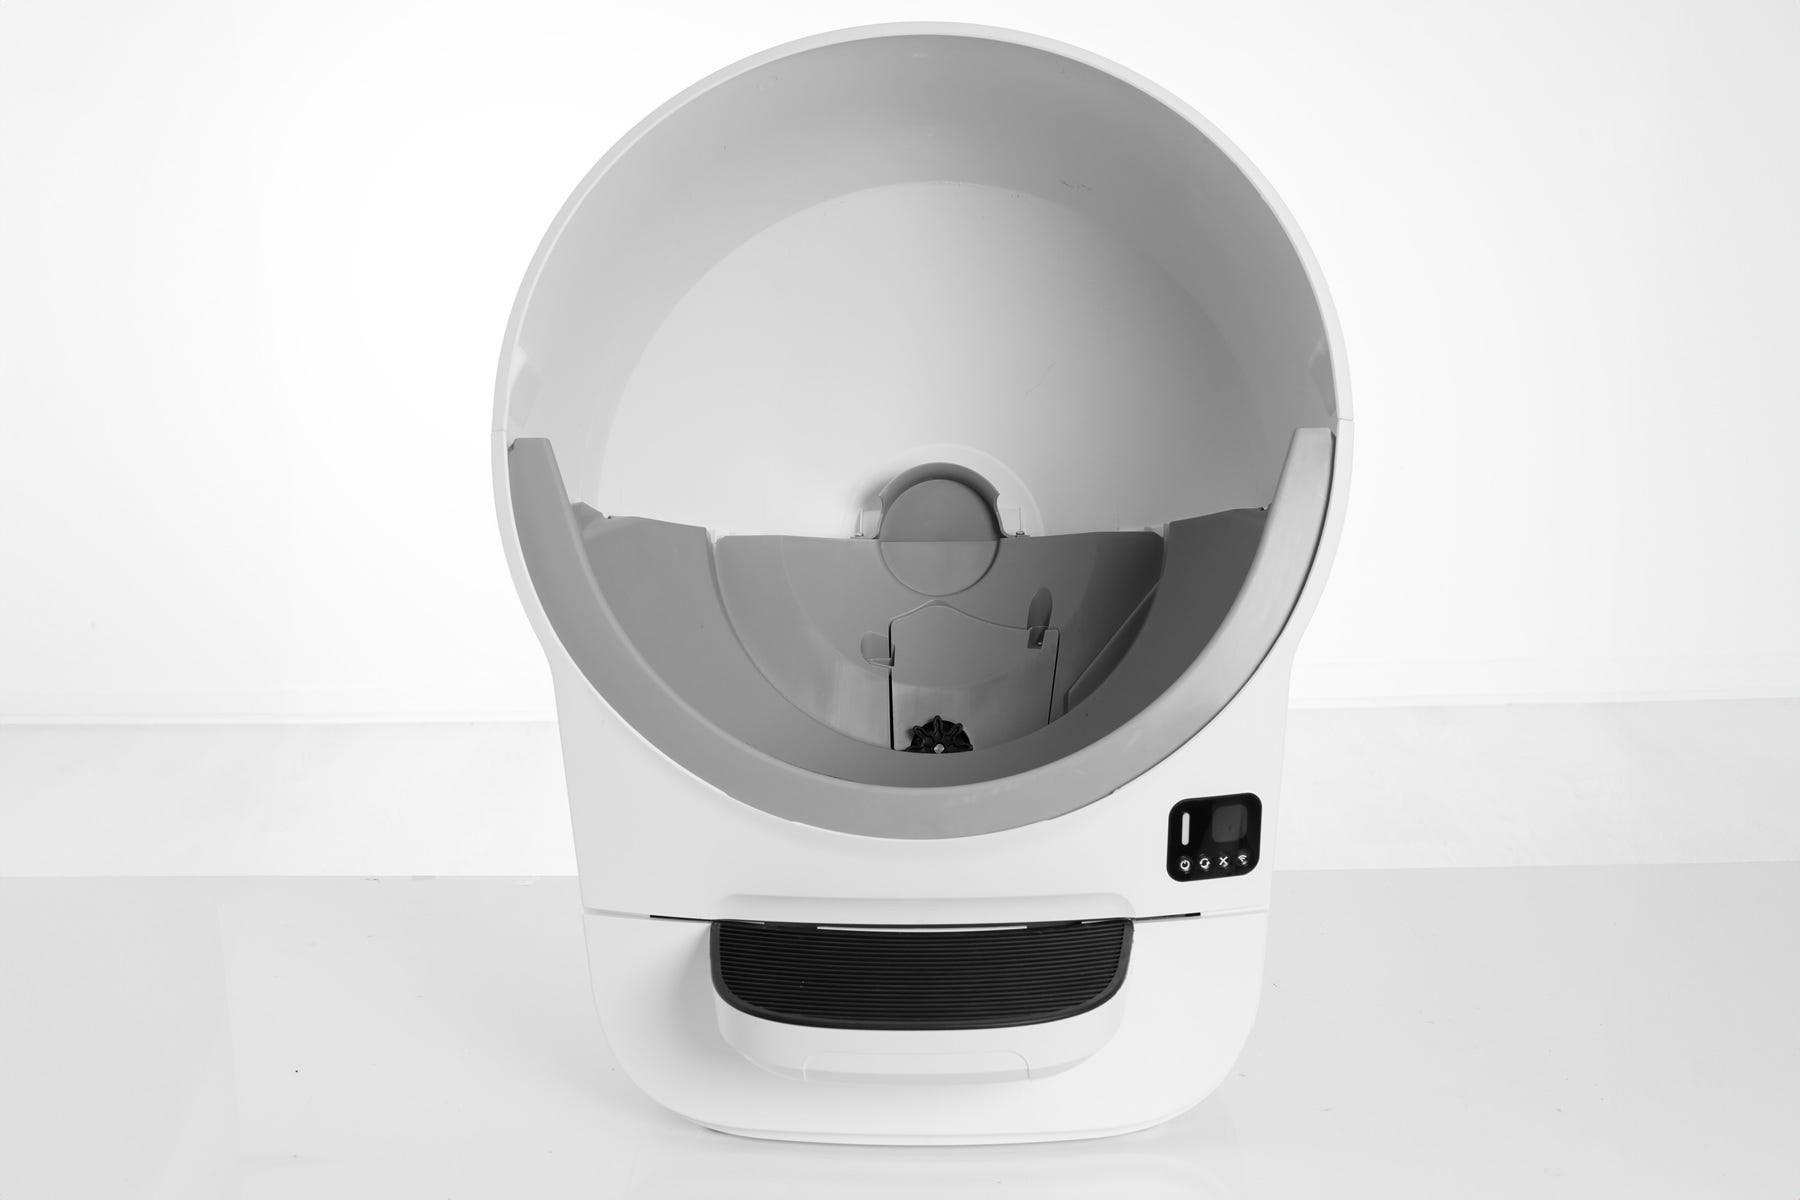
Inspecting the globe
- Inspect the globe for damage such as deep scratches, separating seams, or cracked plastic. Also check that the gear track is not loose.

- Make sure the carbon filter cover is fully seated and has not popped out during shipping or cleaning. If the filter cover is not flush with the globe and snapped in properly, it may interrupt the cycle.
Ensure the four tabs around the filter cover are securely in their corresponding slots.
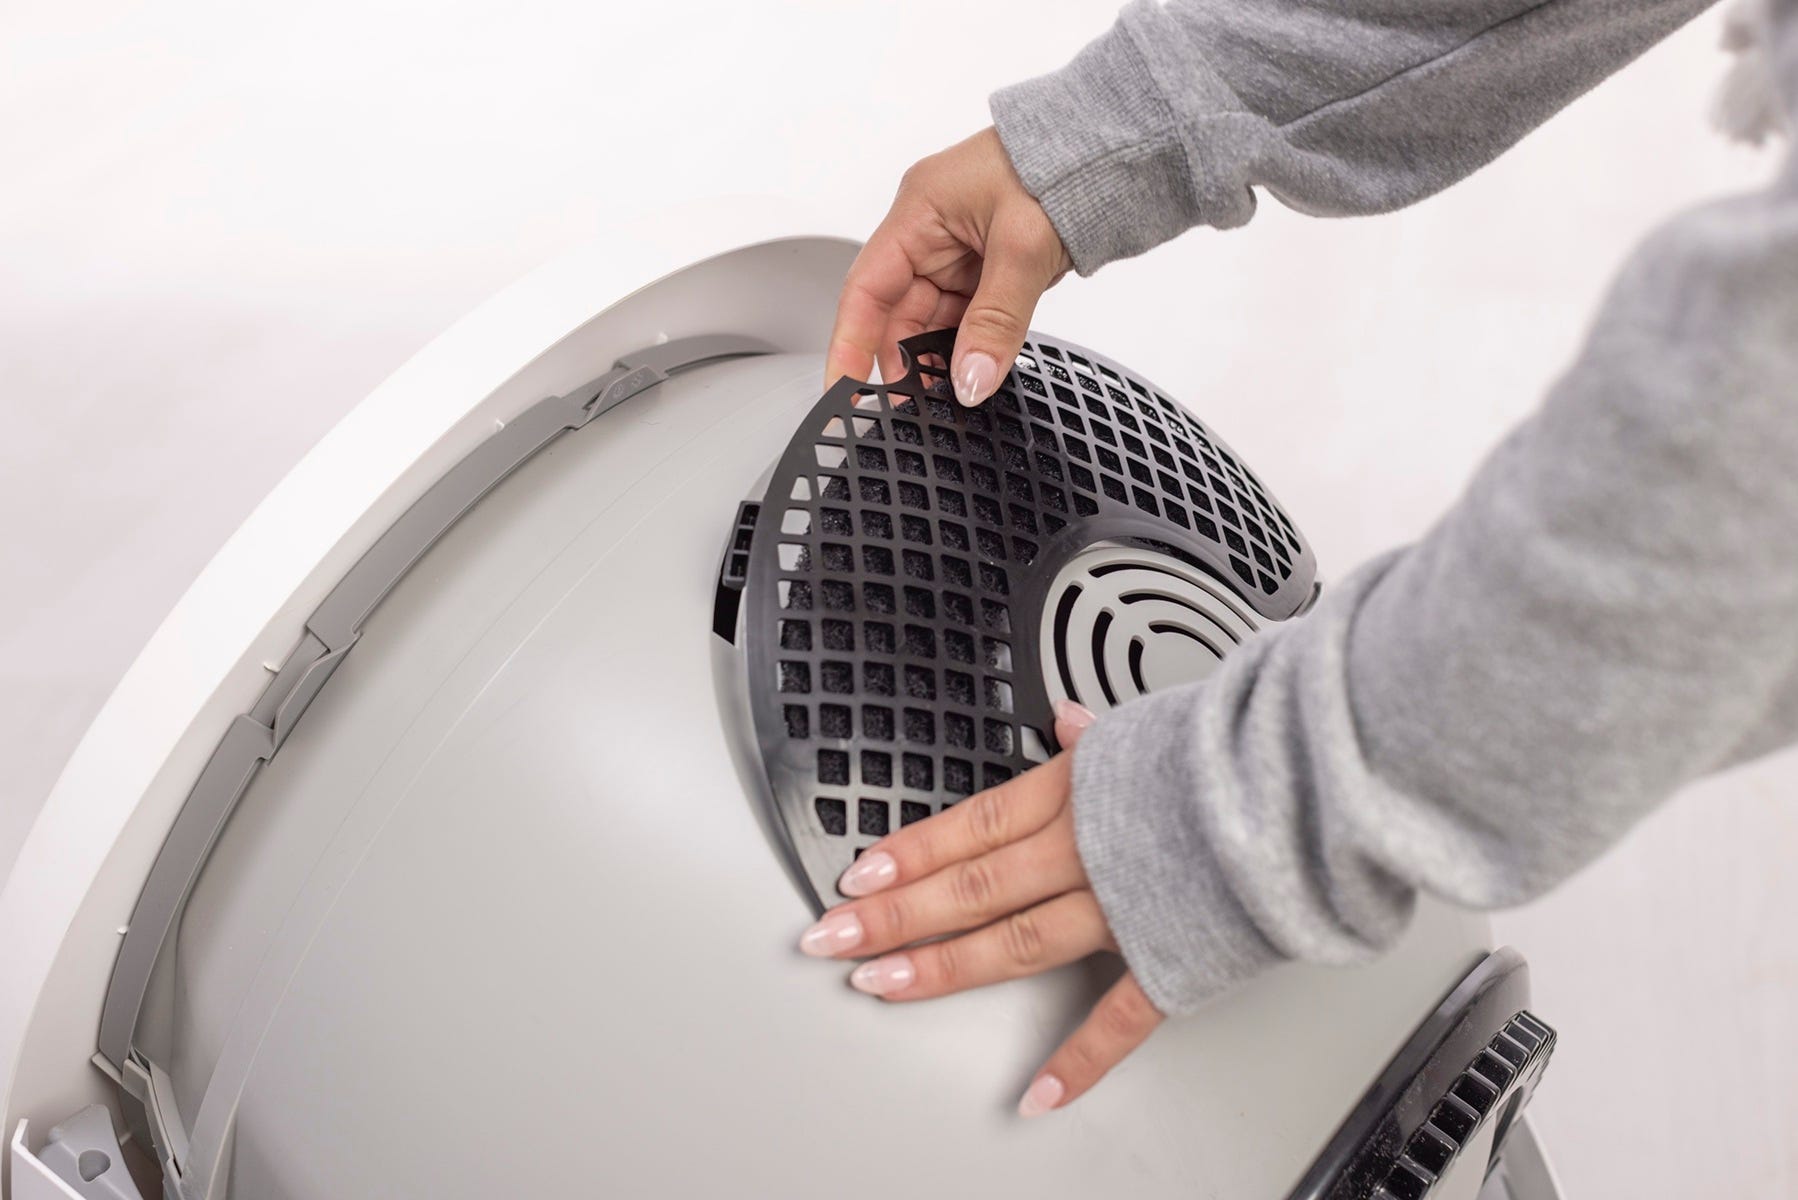
Note: The filter pocket holds one (1) carbon filter or up to (3) OdorTrap Packs. The carbon filter and OdorTrap Packs cannot be used together. We do not recommend using the OdorTrap Holder with Litter-Robot EVO.

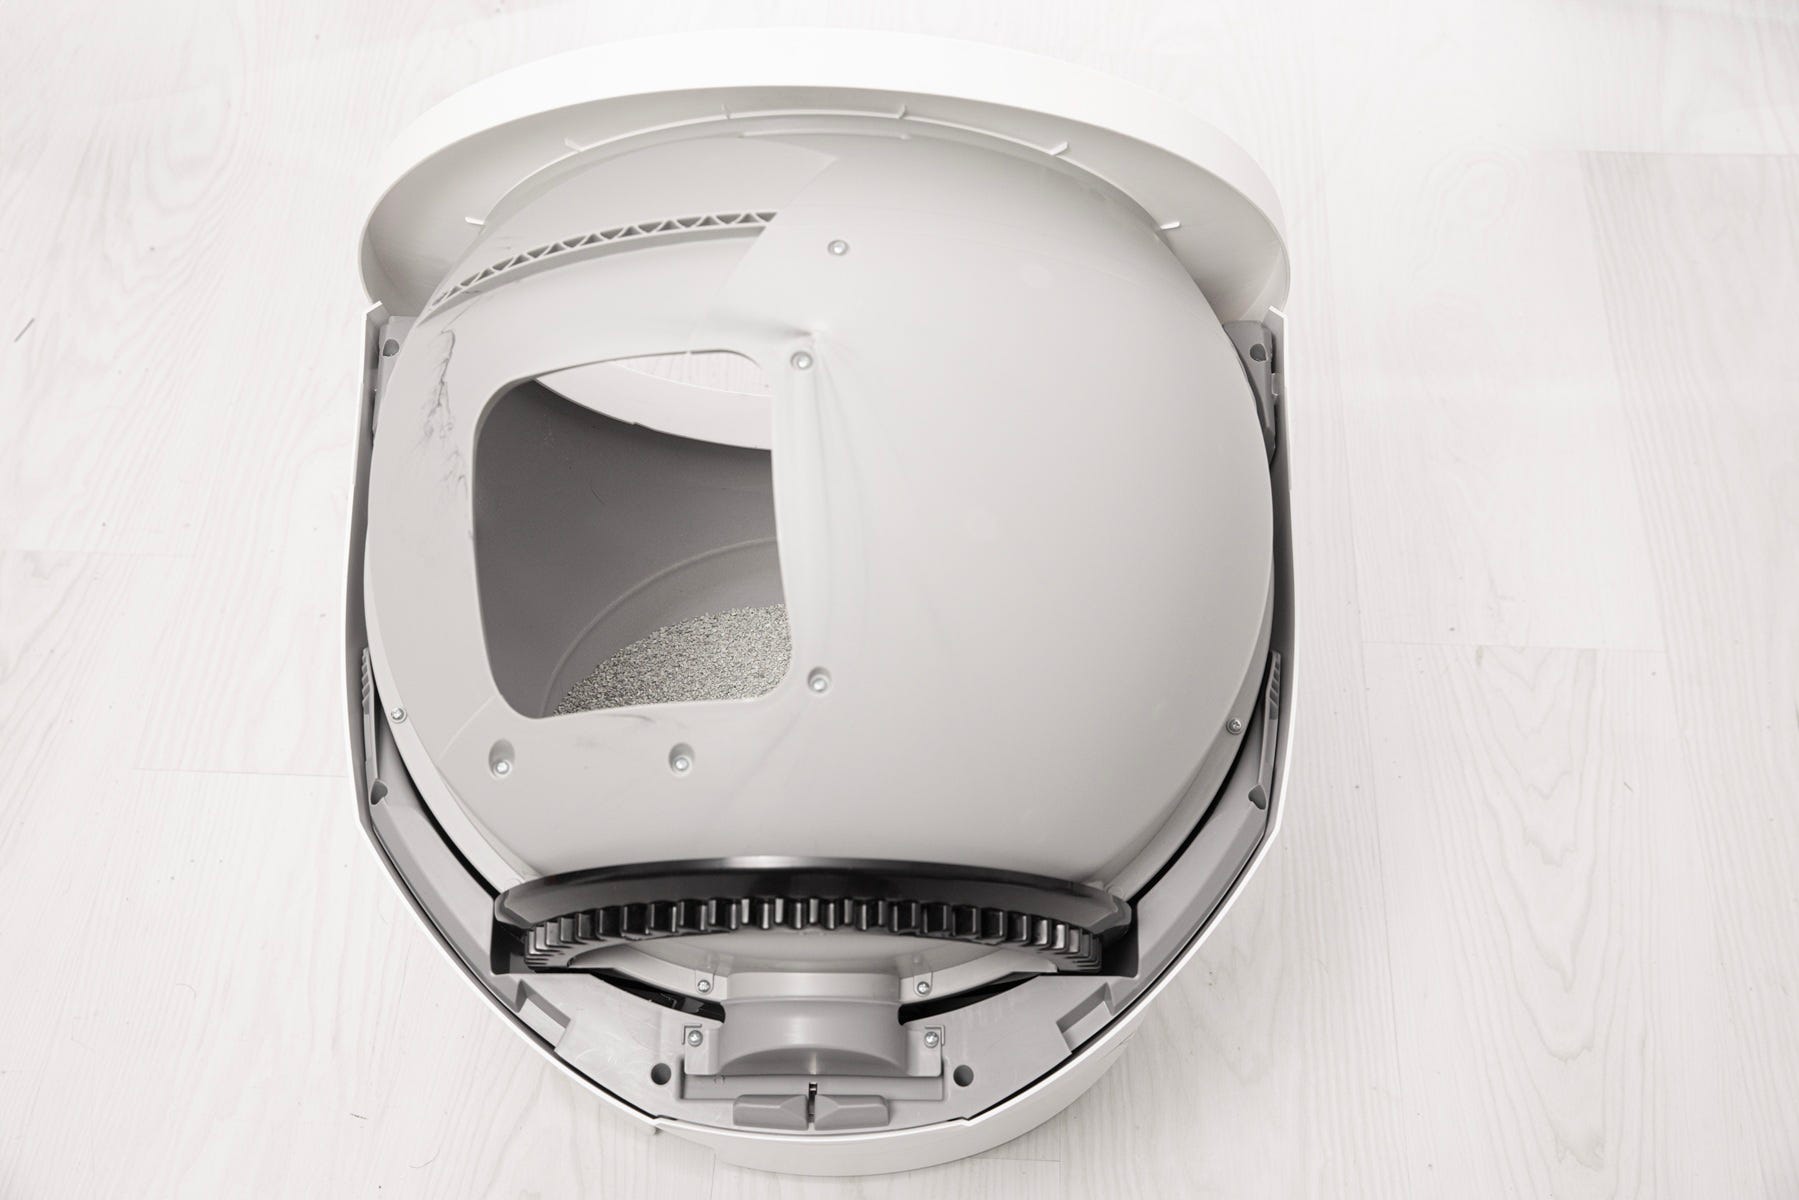
Inspecting the base
Let’s inspect the base for any potential obstructions.
Inspect the exterior, top portion of the base where the globe usually rests. Clean any excess litter that you see that may have missed the dump port. Vacuum cleaning is recommended.

Ensure the seal strips are not peeling up or accumulating litter. This could impact the rotation of the globe.
Note: Seal strips are not required for Litter-Robot EVO to function; they help reduce odors and litter leakage.
- Ensure the two (2) globe glider buttons are attached.

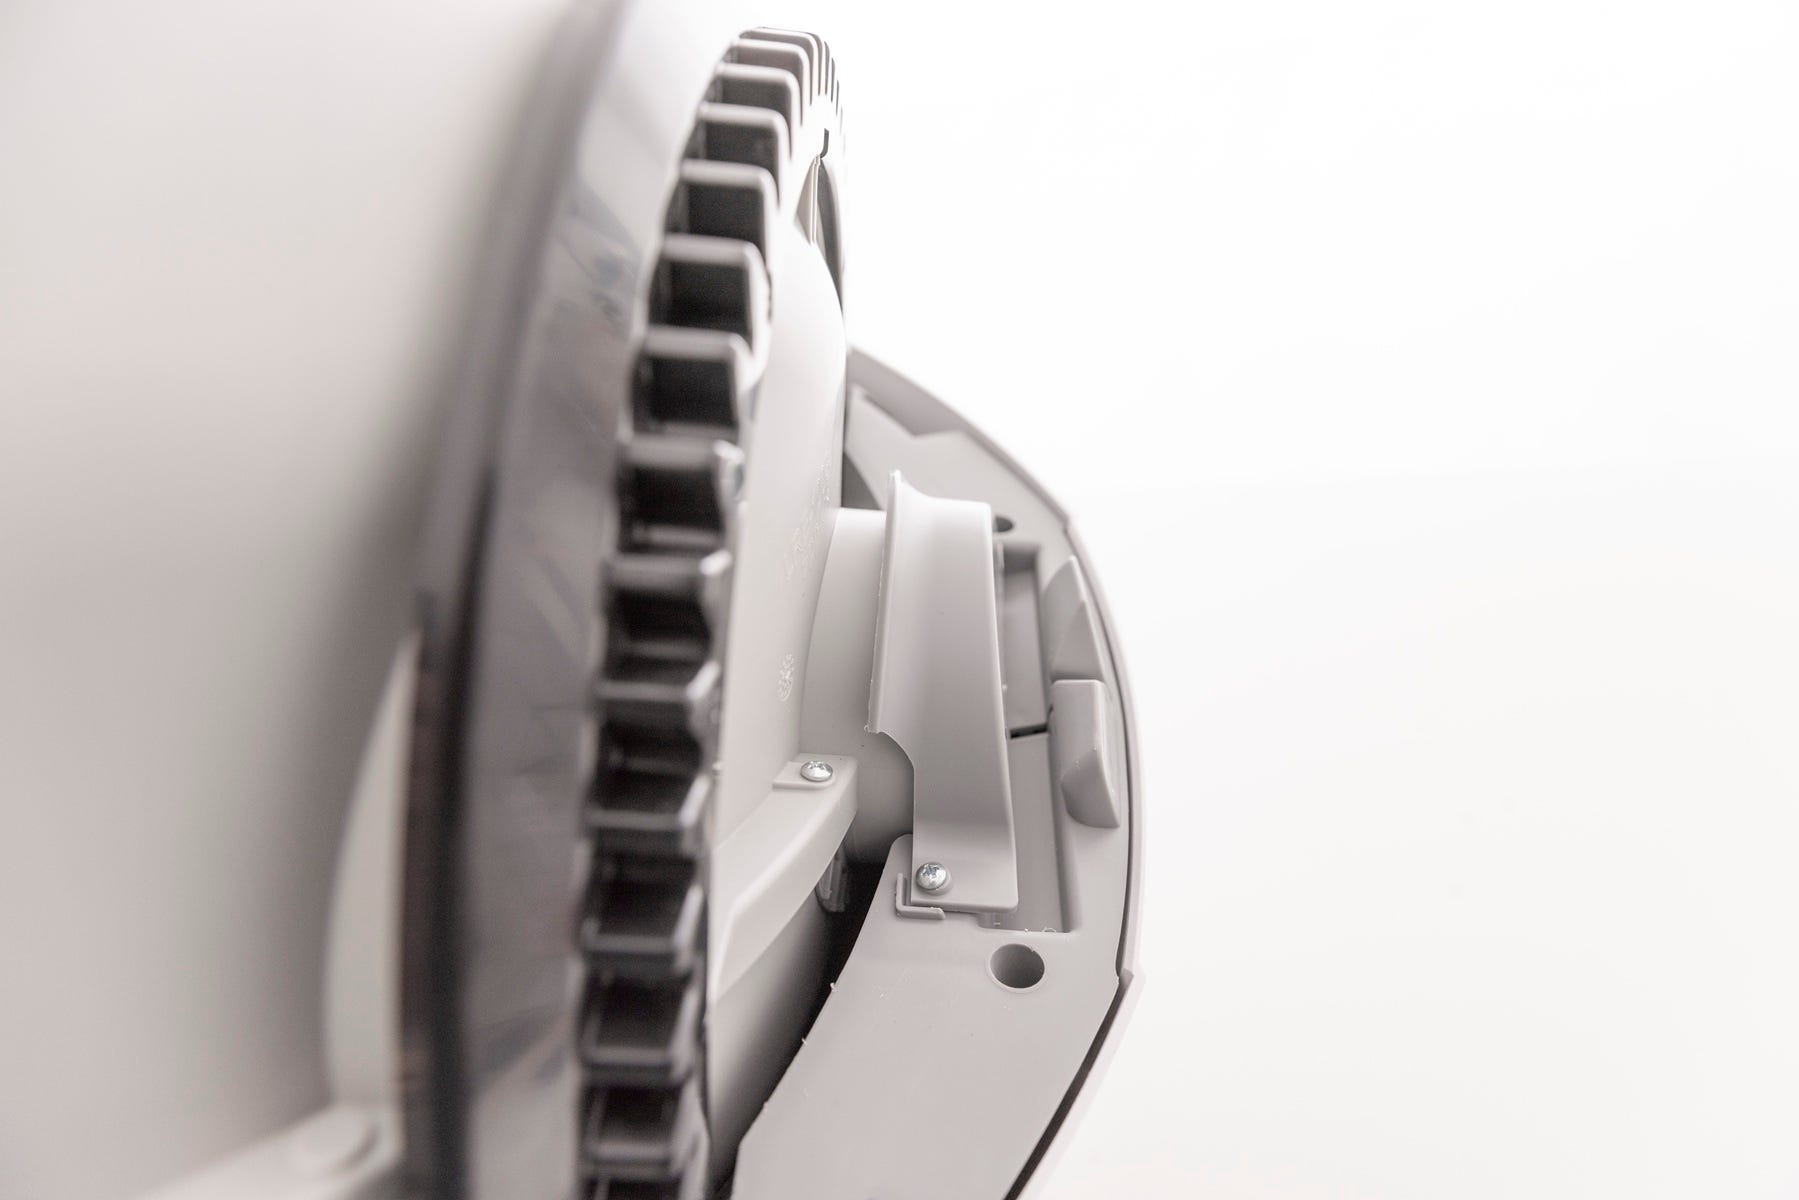
Inspecting the motor
Let’s inspect the motor area for possible obstructions.
- Inspect the motor cover to ensure it is fully seated and screwed down tightly.

Ensure the gear on the motor is not loose and does not rotate freely. If the gear is loose you will need to replace the motor assembly.
Motor test
Next we’ll test the motor without any additional weight or resistance from the globe.
- Reinstall the bonnet without the globe. The motor will not rotate if the bonnet is removed.
Rotate the bonnet upward and align the hinge feature of the bonnet at the back of the base.
To close the bonnet, rotate the bonnet downward, applying slight inward pressure at the handles to align the bonnet within the base.
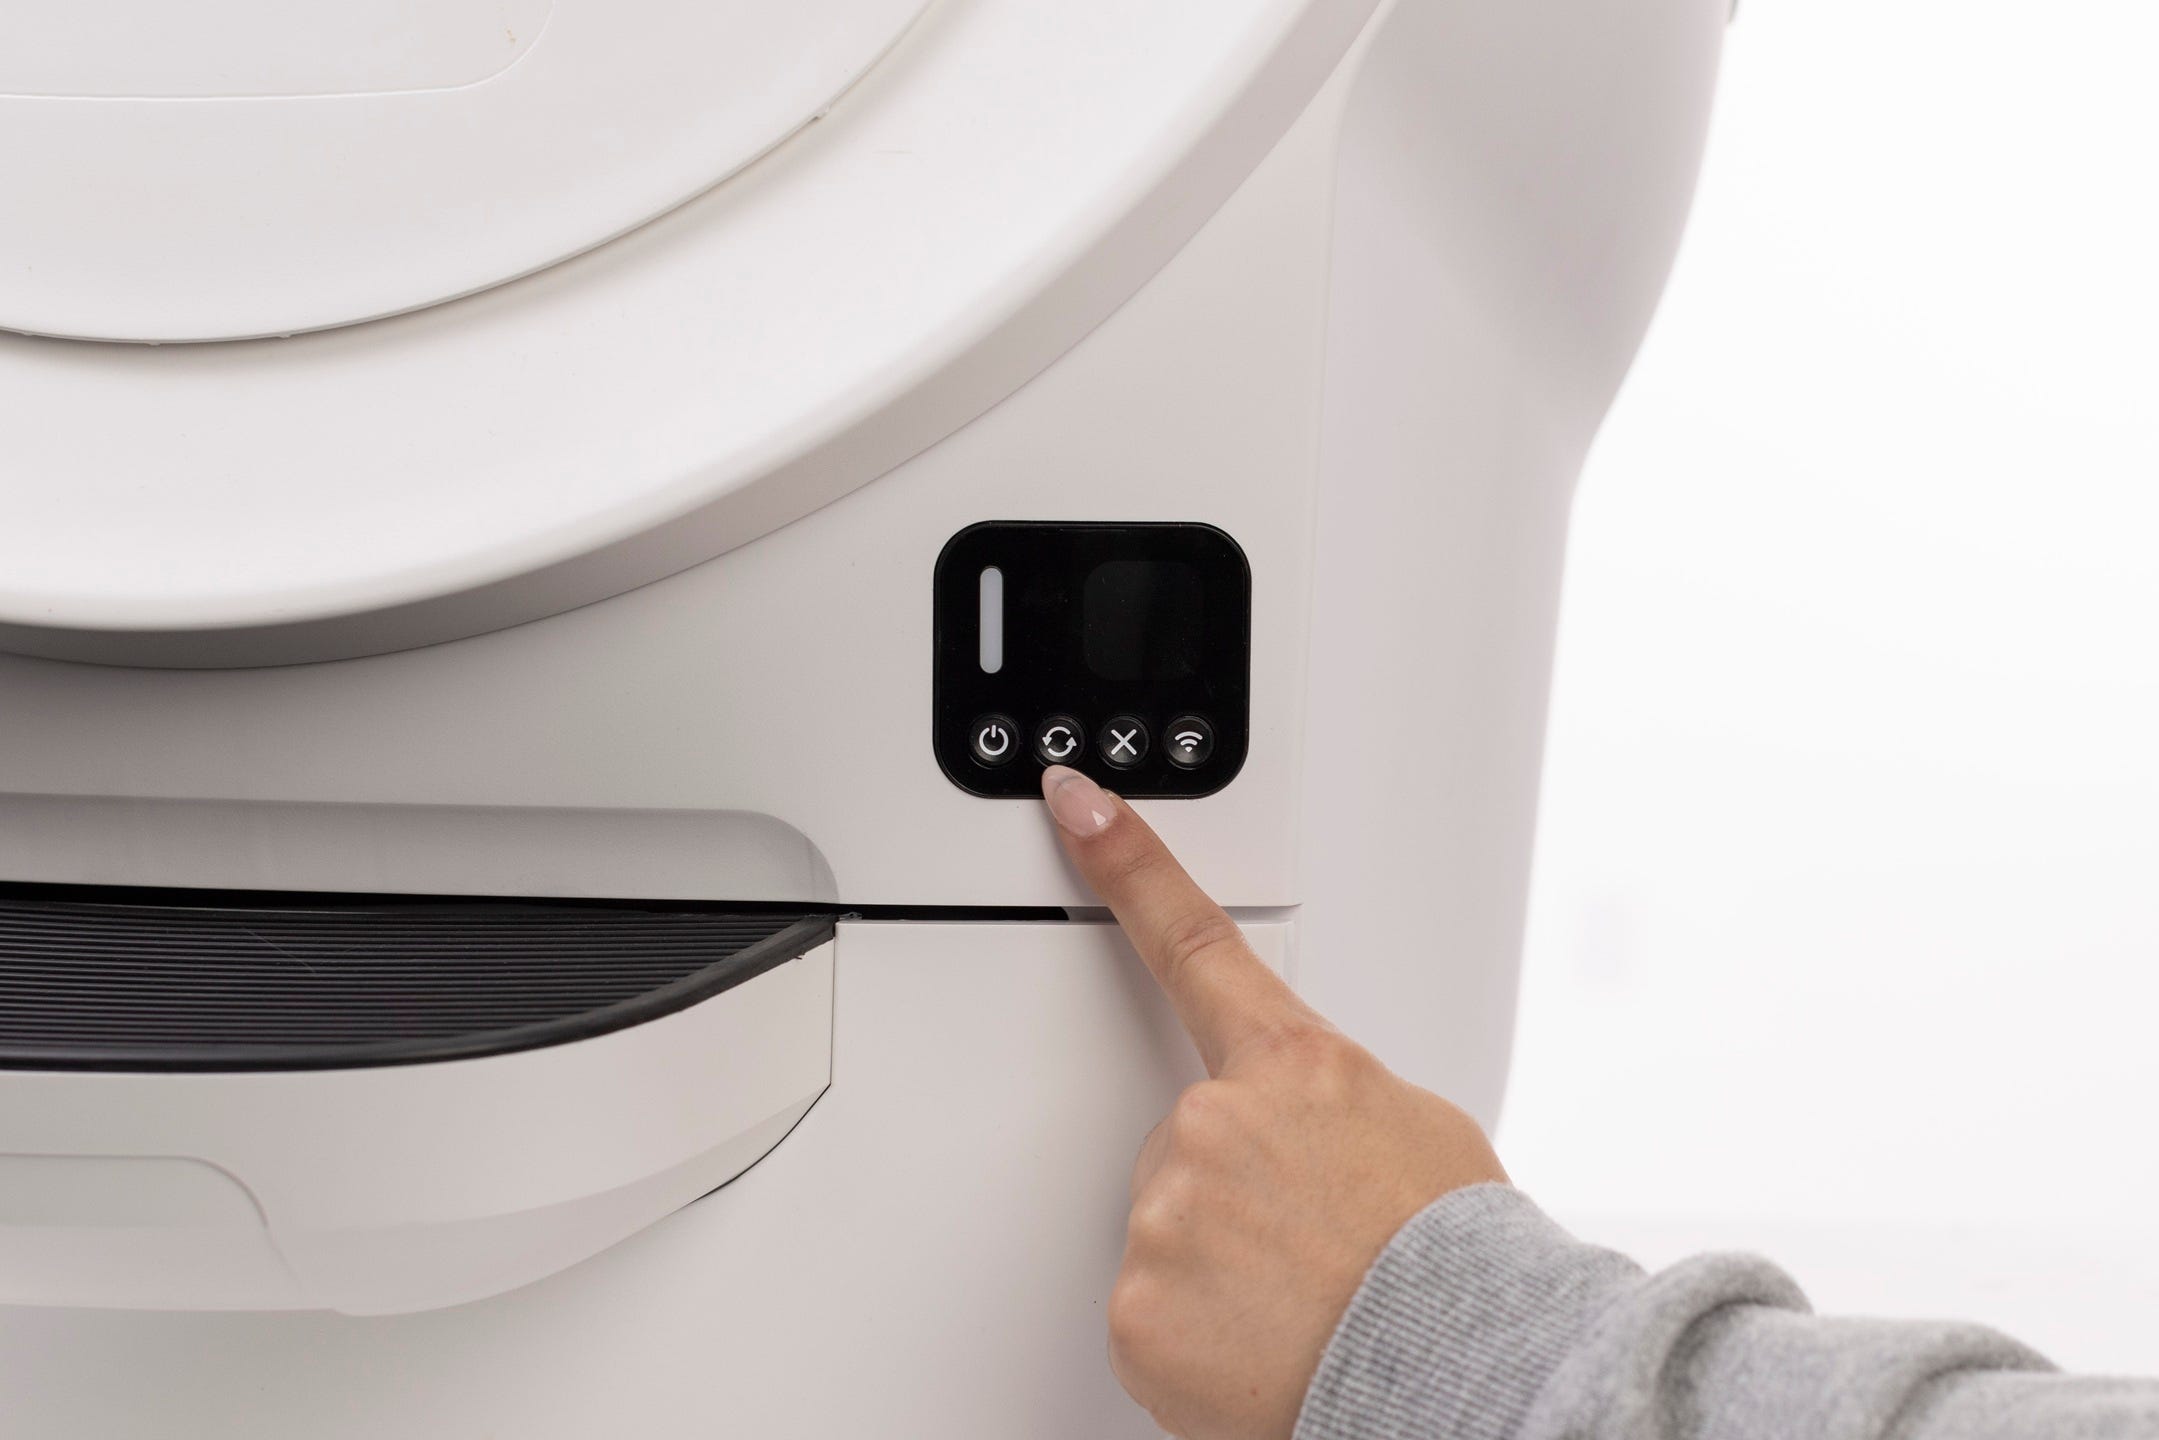
- Short press the Cancel button so your unit displays a solid white LED Indicator Light.
- Short press the Cycle button to test the motor.
The motor gear should begin rotating and the control panel should display a blinking green LED Indicator Light.
Successful: If the white gear on the motor begins rotating and the control panel is displaying a blinking green LED Indicator Light, this indicates the motor is functioning. You'll need to perform a deep cleaning and re-check the globe and gear track again for obstructions.
Unsuccessful: If you are still seeing an Overloaded Globe notification, you will need to replace the motor assembly. Contact Whisker Customer Experience for more assistance.
Reassembly
Now that we’ve checked for any obstructions, let’s re-install the globe and bonnet and check for proper operation of the unit.
Installing the globe
To open the bonnet, use the handles on both sides to rotate the bonnet to its open position. Remove the bonnet and set aside.
To install the globe, hold the globe by the rib at the top of the globe entrance and set it into the base.
When installing the globe, keep the waste port oriented toward the top to ensure the globe is close to the Home position.
- Ensure that the globe end is aligned properly with the retaining bracket at the back of the unit.
- The cylindrical end should align directly beneath the retaining bracket at the rear of the base.
If the globe does not spin after reassembly and initiating a cycle, inspect the alignment and reseat the globe.
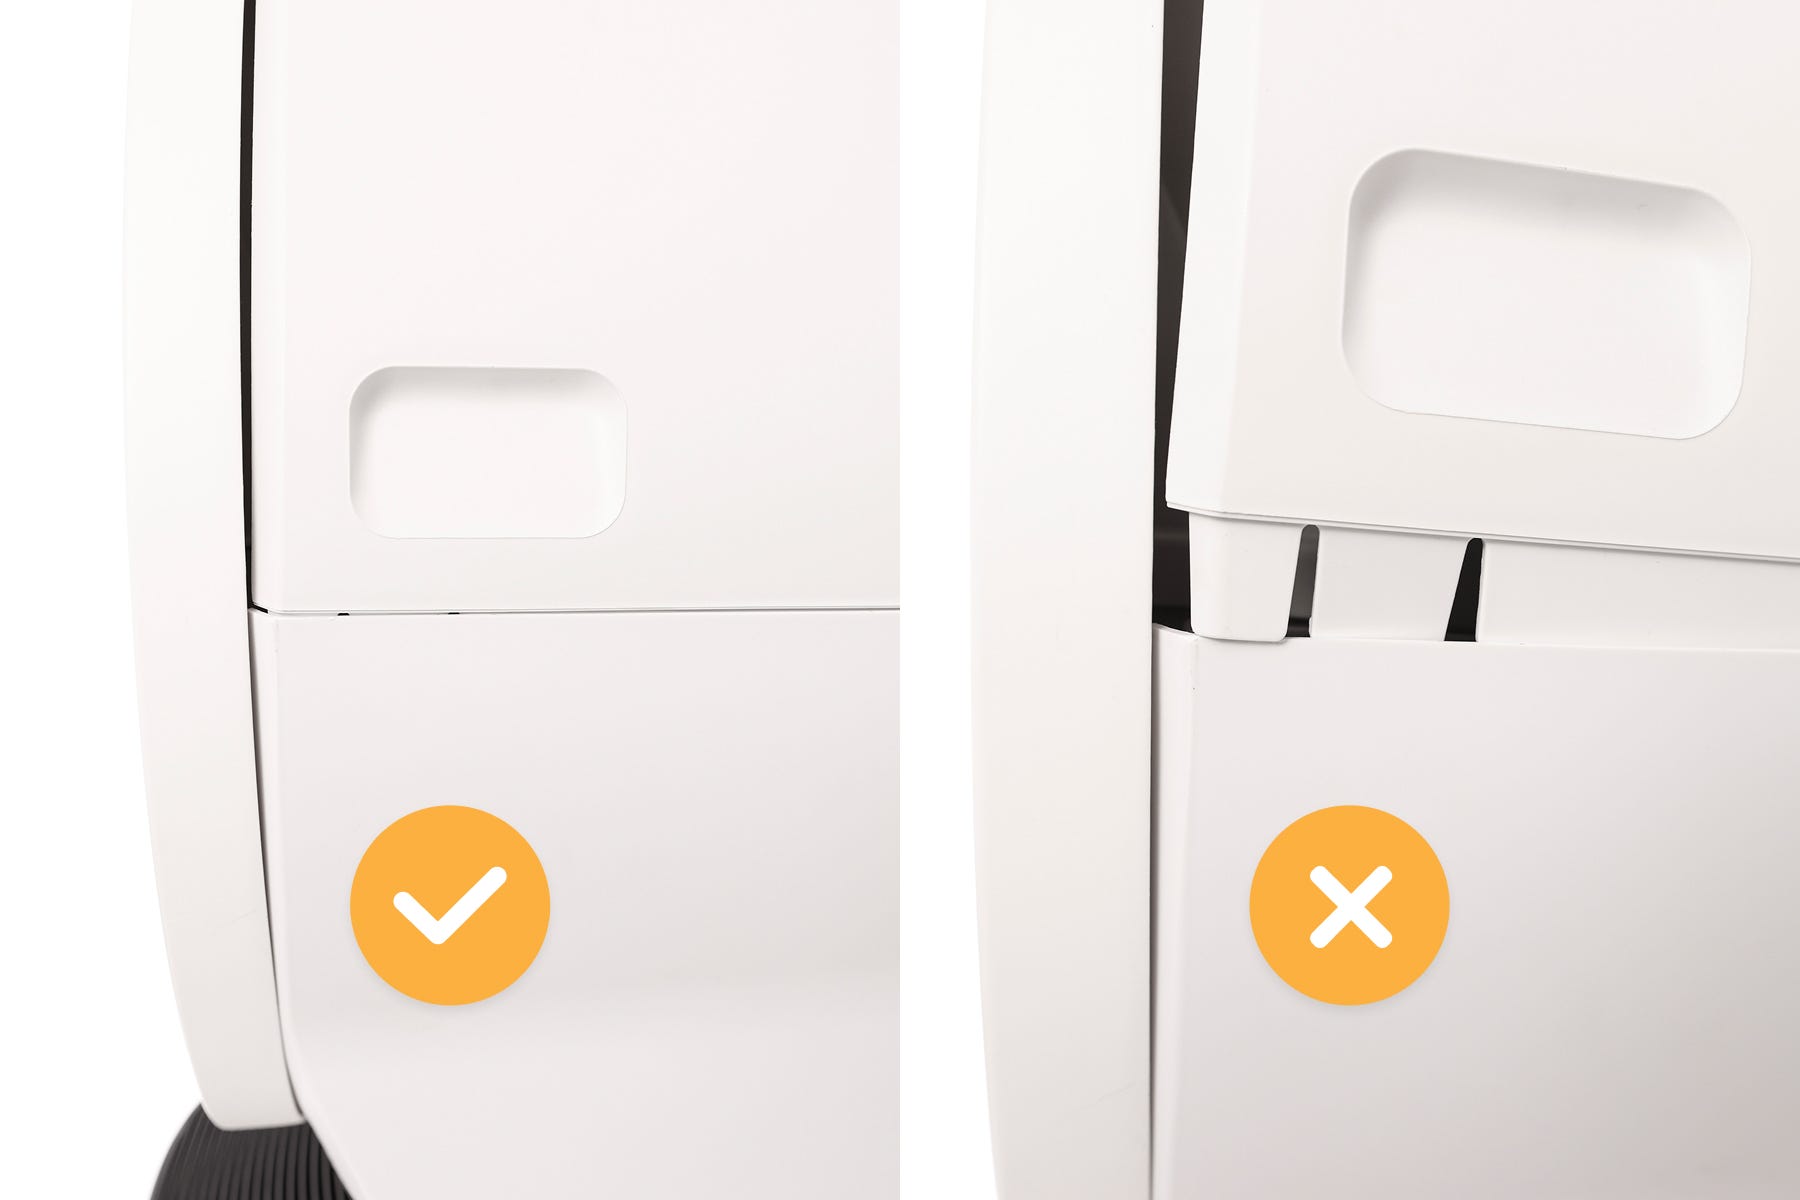
Installing the bonnet
- Replace the bonnet by aligning the tab at the back of the bonnet with the slot in the bonnet hinge.
- Rotate the bonnet downward with light pressure on the sides so that it hugs the globe. This will help ensure proper alignment of the bonnet latches in the base.
- Push down on the bonnet near the handles on the sides of the bonnet to make sure the bonnet has latched into place and feels secure.
Final steps
- Short press the Cancel button to clear any notifications.
- Litter-Robot will display a solid white LED Indicator Light indicating it is ready for use.
Short press the Cycle button to test the motor.
Successful: If your unit returns home and displays a Solid White LED Indicator Light, you’ve been successful.
Unsuccessful: If you are still seeing an Overloaded Globe notification after pressing Cancel the Home position, you will need to replace the motor assembly.
Need more help?
If you've followed these steps and your Litter-Robot is still displaying the Overloaded Globe notification, contact Whisker Customer Experience for more help.
Didn't find what you're looking for?
Live support available Mon-Fri: 9AM-9PM EST and Sat-Sun: 9AM-5PM EST, or submit a ticket anytime.